The majesty of elephants has captivated human imagination for centuries, and their distinctive silhouette is instantly recognizable. For artists and enthusiasts alike, capturing the essence of an elephant in a simple drawing can be a fun and rewarding experience. This guide will walk you through the basic steps of drawing an elephant, focusing on simplicity and clarity to help you achieve a drawing that is both recognizable and endearing.
Introduction to Drawing Elephants
Drawing an elephant, despite its simplicity, requires an understanding of its basic body shape and proportions. Elephants are known for their large ears, long trunks, and columnar legs, which provide a sturdy base for their massive bodies. When drawing an elephant, it’s essential to keep these features in proportion to ensure your drawing looks like an elephant.
Step-by-Step Drawing Guide
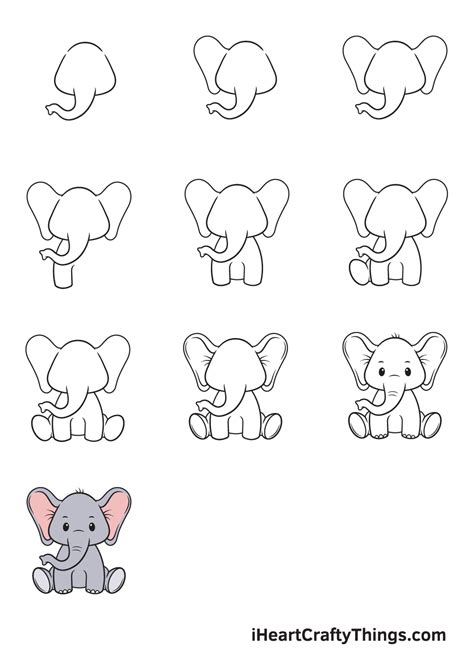
Body Shape: Start by drawing a large oval for the body. This oval should be slightly tilted, with the top end leaning towards the back. The body is the largest part of the elephant and serves as the foundation for the rest of your drawing.
Head Shape: Attach a smaller oval to the front of the body for the head. The head oval should be positioned so that it’s slightly angled upwards, creating a gentle slope from the back of the body to the front of the head.
Trunk: The trunk is perhaps the most distinctive feature of an elephant. Draw a long, curved cylinder extending from the front of the head. The trunk should curve downwards, ending in a small oval shape that represents the trunk’s tip.
Ears: Elephants have large ears that help them regulate their body temperature and hear distant sounds. Draw two large oval shapes on the sides of the head, making sure they are big enough to be prominent features. Each ear should be slightly rounded at the edges and have a notch at the bottom where it meets the head.
Tusks: Not all elephants have tusks, but if you want to draw them, they can be represented by two small triangular shapes protruding from the mouth area of the head. Make sure they are in proportion to the rest of the face.
Legs and Feet: Draw four columnar legs under the body. The front legs should be slightly closer together than the back legs, creating a stable base for the elephant. The feet are large and oval-shaped, with five toes. You can simplify the toes by drawing a series of small ovals or by indicating their presence with short lines.
Tail: A long, thin tail extends from the back of the body, ending in a tuft of hair. You can draw this as a long, thin rectangle with a fluffy end.
Details: Finally, add some basic details to your elephant. Draw two small circles for the eyes, and a smaller circle for the nose at the end of the trunk. You can also add some wrinkles around the eyes and on the body to give your elephant some character.
Tips for Improvement
- Practice: Like any drawing skill, practice makes perfect. Try drawing your elephant from different angles to get a feel for its proportions and features.
- Reference: Use real-life photos or videos of elephants as reference points. Observing how they move and the way their bodies are structured can help you draw more accurately.
- Simplicity: Remember, the goal is to draw a simple elephant. Don’t worry too much about details; focus on capturing the essence and proportions of the animal.
Troubleshooting Common Mistakes
- Proportions: A common mistake is getting the proportions wrong. Make sure the body is large enough to support the head, ears, and legs. The ears should be big, but not so big that they overwhelm the head.
- Trunk Shape: The trunk should be long and curved, not straight or too short. Its shape is crucial for the elephant’s recognizability.
- Leg Positioning: Ensure the legs are positioned correctly under the body. Incorrect positioning can make the elephant look unstable or unnatural.
Conclusion
Drawing an elephant is a fun and creative activity that can help you develop your drawing skills and appreciation for these magnificent creatures. By following these simple steps and practicing regularly, you can create a drawing that captures the essence of an elephant. Remember, the key to a good drawing is not just in the details but in the overall proportions and spirit of the subject.
Frequently Asked Questions
What is the most important feature to get right when drawing an elephant?
+The proportions are crucial. Ensuring that the body, head, ears, and legs are in the right proportion to each other will make your drawing recognizable as an elephant.
How do I add more realism to my elephant drawing?
+Adding textures to the skin, like wrinkles and folds, and detailing the eyes, ears, and trunk can make your elephant look more realistic. Using references from real-life photos can also help.
What if my drawing doesn't look perfect?
+It's okay if your drawing isn't perfect. The process of drawing is about learning and having fun. Practice regularly, and you'll see improvement over time. Remember, simplicity and capturing the essence of the elephant are more important than perfection.
By embracing simplicity and focusing on the core features of an elephant, you can create a drawing that is not only recognizable but also charming. Drawing is a skill that develops over time with practice and patience, so don’t be discouraged if your first attempts don’t turn out as expected. Keep practicing, and most importantly, enjoy the process of creating and bringing these wonderful creatures to life on paper.