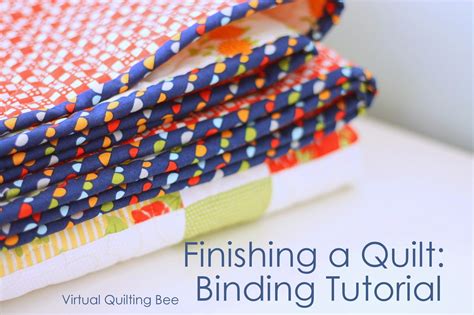
The final stretch of your quilting journey - binding your quilt. This is the moment when all your hard work and dedication come together to create a beautiful, finished piece of art. Binding a quilt can seem intimidating, especially for beginners, but with the right techniques and tools, it can be a straightforward and enjoyable process. In this comprehensive guide, we’ll walk you through the easy finishing tips to help you bind your quilt like a pro.
Understanding Quilt Binding
Before we dive into the nitty-gritty of binding a quilt, let’s take a moment to understand what quilt binding is all about. Quilt binding, also known as edge finishing, is the process of attaching a strip of fabric to the edges of a quilt to cover the raw edges and give the quilt a finished look. The binding serves several purposes - it prevents the quilt from fraying, adds a decorative touch, and helps to reinforce the edges of the quilt.
Preparing for Binding
Before you start binding your quilt, make sure you have everything you need. Here’s a checklist to get you started:
- Binding fabric: Choose a fabric that complements the colors and theme of your quilt. You’ll need enough fabric to cover all four sides of your quilt, plus some extra for seam allowances and corners.
- Thread: Select a thread that matches the color of your binding fabric.
- Sewing machine: You’ll need a sewing machine with a walking foot or even foot to help guide the quilt and binding smoothly.
- Rotary cutter and mat: These tools will come in handy for cutting your binding strips accurately.
- Ruler: A long, straight ruler is essential for measuring and cutting your binding strips.
- Iron and ironing board: Pressing your binding strips and seams is crucial for a professional finish.
Cutting Binding Strips
Cutting your binding strips is a critical step in the binding process. Here are some tips to keep in mind:
- Strip width: The standard width for binding strips is 2.5 inches, but you can adjust this to suit your preferences.
- Strip length: Cut your strips to the length you need, leaving some extra for seam allowances and corners.
- Grain direction: Always cut your binding strips along the grain line (parallel to the selvedge edge) to ensure stability and prevent stretching.
Attaching the Binding
Now it’s time to attach the binding to your quilt. Here’s a step-by-step guide to help you get started:
- Prepare your quilt: Make sure your quilt is pressed and ready for binding.
- Attach the binding: Start by attaching the binding to the back of your quilt, aligning the raw edges and using a 1⁄4-inch seam allowance.
- Miter the corners: To create a neat and tidy corner, fold the binding strip back and then forward, creating a 45-degree angle.
- Hand-stitch the binding: Fold the binding strip to the front of the quilt and hand-stitch in place, using a whipstitch or a blind stitch.
Tips and Variations
Here are some tips and variations to help you take your quilt binding to the next level:
- Use a Walking Foot: A walking foot can help guide your quilt and binding smoothly, reducing the risk of bunching or distortion.
- Press as You Go: Pressing your binding strips and seams as you go can help create a crisp, professional finish.
- Experiment with Different Binding Styles: Try different binding styles, such as flanged binding or piping, to add a decorative touch to your quilt.
- Add a Label: Consider adding a label to the back of your quilt, including your name, the date, and any special details about the quilt.
Common Mistakes to Avoid
Here are some common mistakes to avoid when binding a quilt:
- Inconsistent seam allowances: Make sure to use consistent seam allowances throughout the binding process to ensure a professional finish.
- Insufficient pressing: Pressing your binding strips and seams is crucial for a crisp, professional finish.
- Not leaving enough extra fabric: Leave enough extra fabric for seam allowances and corners to ensure a neat and tidy finish.
Conclusion
Binding a quilt is a rewarding process that requires patience, attention to detail, and practice. By following these easy finishing tips, you’ll be well on your way to creating a beautiful, professionally finished quilt that will be treasured for years to come. Remember to take your time, press as you go, and experiment with different binding styles to add a decorative touch to your quilt.
What is the best way to cut binding strips?
+The best way to cut binding strips is to use a rotary cutter and mat, cutting along the grain line (parallel to the selvedge edge) to ensure stability and prevent stretching.
How do I attach the binding to the quilt?
+To attach the binding to the quilt, start by attaching the binding to the back of the quilt, aligning the raw edges and using a 1⁄4-inch seam allowance. Then, fold the binding strip to the front of the quilt and hand-stitch in place, using a whipstitch or a blind stitch.
What are some common mistakes to avoid when binding a quilt?
+Some common mistakes to avoid when binding a quilt include inconsistent seam allowances, insufficient pressing, and not leaving enough extra fabric for seam allowances and corners.


